Arduino
We are leading Supplier & Distributor for the Arduino Boards which also includes Arduino Mega ADK & Arduino Uno since 2012
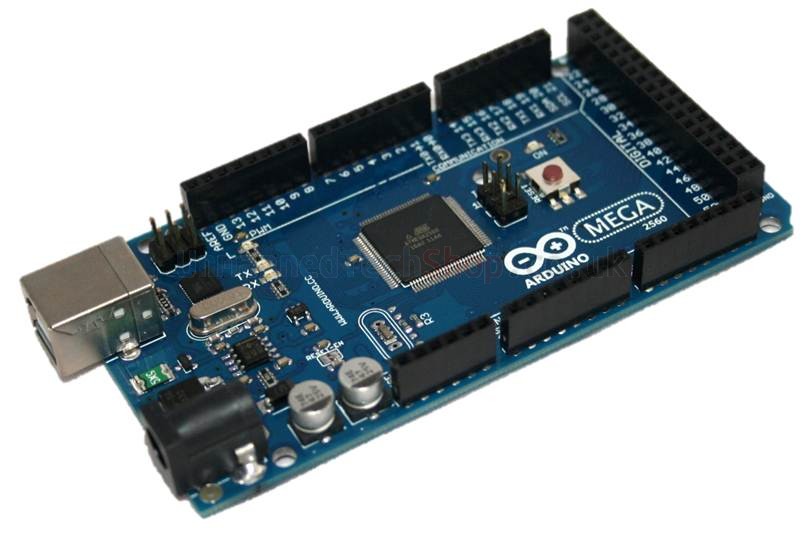
Arduino Mega ADK
Arduino boards are small physical computing platforms, consisting of a simple I/O board and an integrated development environment. Arduino’s can be used to develop standalone interactive objects or can be connected to software on your computer.We a offer a very wide range of Arduino boards.
Summary
Microcontroller
ATmega2560
Operating Voltage
5V
Input Voltage (recommended)
9V
Input Voltage (limits)
7-18V
Digital I/O Pins
54 (of which 14 provide PWM output)
Analog Input Pins
16
DC Current per I/O Pin
40 mA
DC Current for 3.3V Pin
50 mA
Flash Memory
256 KB of which 8 KB used by bootloader
SRAM
8 KB
EEPROM
4 KB
Clock Speed
16 MHz
Arduino Uno
This is the new Arduino Uno R3. In addition to all the features of the previous board, the Uno now uses an ATmega16U2 instead of the 8U2 found on the Uno (or the FTDI found on previous generations). This allows for faster transfer rates and more memory. No drivers needed for Linux or Mac (inf file for Windows is needed and included in the Arduino IDE), and the ability to have the Uno show up as a keyboard, mouse, joystick, etc.
The Uno R3 also adds SDA and SCL pins next to the AREF. In addition, there are two new pins placed near the RESET pin. One is the IOREF that allow the shields to adapt to the voltage provided from the board. The other is a not connected and is reserved for future purposes. The Uno R3 works with all existing shields but can adapt to new shields which use these additional pins.
Arduino is an open-source physical computing platform based on a simple i/o board and a development environment that implements the Processing/Wiring language. Arduino can be used to develop stand-alone interactive objects or can be connected to software on your computer (e.g. Flash, Processing, MaxMSP). The open-source IDE can be downloaded for free (currently for Mac OS X, Windows, and Linux).
Features:
§ ATmega328 microcontroller
§ Input voltage – 7-12V
§ 14 Digital I/O Pins (6 PWM outputs)
§ 6 Analog Inputs
§ 32k Flash Memory
§ 16Mhz Clock Speed
Arduino Uno R3 Clone Microcontroller Boards
Arduino Uno r3 clone Microcontroller Boards
OverviewThe Arduino Uno is a micro controller board based on the ATmega328 (datasheet). It has 14 digital input/output pins (of which 6 can be used as PWM outputs), 6 analog inputs, a 16 MHz ceramic resonator, a USB connection, a power jack, an ICSP header, and a reset button. It contains everything needed to support the microcontroller; simply connect it to a computer with a USB cable or power it with a AC-to-DC adapter or battery to get started.The Uno differs from all preceding boards in that it does not use the FTDI USB-to-serial driver chip. Instead, it features the Atmega16U2 (Atmega8U2 up to version R2) programmed as a USB-to-serial converter.Revision 2 of the Uno board has a resistor pulling the 8U2 HWB line to ground, making it easier to put into DFU mode.Revision 3 of the board has the following new features: 1.0 pinout: added SDA and SCL pins that are near to the AREF pin and two other new pins placed near to the RESET pin, the IOREF that allow the shields to adapt to the voltage provided from the board. In future, shields will be compatible with both the board that uses the AVR, which operates with 5V and with the Arduino Due that operates with 3.3V. The second one is a not connected pin, that is reserved for future purposes.Stronger RESET circuit.Atmega 16U2 replace the 8U2.”Uno” means one in Italian and is named to mark the upcoming release of Arduino 1.0. The Uno and version 1.0 will be the reference versions of Arduino, moving forward. The Uno is the latest in a series of USB Arduino boards, and the reference model for the Arduino platform; for a comparison with previous versions, see the index of Arduino boards.
Arduino Uno R3
Arduino is an open-source physical computing platform based on a simple i/o board and a development environment that implements the Processing/Wiringlanguage. Arduino can be used to develop stand-alone interactive objects or can be connected to software on your computer (e.g. Flash, Processing, MaxMSP). The open-source IDE can be downloaded for free (currently for Mac OS X, Windows, and Linux).
Note: The Arduino Uno R3 requires the Arduino 1.0 drivers folder in order to install properly on some computers. We have tested and confirmed that the R3 can be programmed in older versions of the IDE. However, the first time using the R3 on a new computer, you will need to have Arduino 1.0 installed on that machine. If you are interested in reading more about the changes to the IDE, check out the official Arduino 1.0 Release notes!
Not sure which Arduino or Arduino-compatible board is right for you? Check out our Arduino Buying Guide!
Microcontroller Boards
Description: Arduino is an open-source physical computing platform based on a simple i/o board and a development environment that implements the Processing/Wiring language. Arduino can be used to develop stand-alone interactive objects or can be connected to software on your computer (e.g. Flash, Processing, MaxMSP). The open-source IDE can be downloaded for free (currently for Mac OS X, Windows, and Linux).
The Arduino Mega is a microcontroller board based on the ATmega2560. It has 54 digital input/output pins (of which 14 can be used as PWM outputs), 16 analog inputs, 4 UARTs (hardware serial ports), a 16 MHz crystal oscillator, a USB connection, a power jack, an ICSP header, and a reset button. It contains everything needed to support the microcontroller; simply connect it to a computer with a USB cable or power it with a AC-to-DC adapter or battery to get started. The Mega is compatible with most shields designed for the Arduino Duemilanove or Diecimila.
The Mega 2560 R3 also adds SDA and SCL pins next to the AREF. In addition, there are two new pins placed near the RESET pin. One is the IOREF that allow the shields to adapt to the voltage provided from the board. The other is a not connected and is reserved for future purposes. The Mega 2560 R3 works with all existing shields but can adapt to new shields which use these additional pins.
PcDuino3 – Dev Board
Description: The pcDuino3 is a high performance, cost effective mini PC platform that runs full-featured operating systems such as Ubuntu and Android. In addition to running Linux and Android, the pcDuino3 has support for programming languages such as C, C++, Java, Python, Arduino, and more. You can even use your favorite Arduino shields for added hardware capability. The pcDuino3 has an impressive set of features including an IR receiver, SATA host, USB-OTG, LVDS LCD interface, MIPI camera interface, 3.5mm audio output, battery header, WiFi, Ethernet, and more. If you’re looking for the ‘kitchen sink’ of development boards, look no further.
The pcDuino acts much like a computer, needing only a 5v (2A) power supply, keyboard, mouse and display to get running. You can even use the USB-OTG to connect remotely. Connect it to your network with either the WiFi module or Ethernet jack so you can log data, run a web server, or control devices remotely. The more powerful pcDuino uses a dual core A20 processor which makes it one of the most powerful single board computers on the market.
An API has been developed for the pcDuino3 that allows the user to access all of the functions that you would expect using simple Arduino-style language. Additionally Ubuntu and Android OS Images can be found in the Documents section below.
LilyPad Arduino USB – ATmega32U4 Board
Description: The LilyPad Simple just got a whole lot… simpler. We’ve updated the Simple board to create the LilyPad USB by replacing the classic ATMega328 with the new ATMega32U4. Not only does that mean that it’s running a variation of the latest and greatest bootloader, but it also means no more FTDI Basic! The only extra piece of hardware you need to program the LilyPad USB is a micro-USB cable, since the new IC has built-in USB support. The LilyPad USB is also officially supported in the Arduino IDE as of version 1.0.2!
Just like the LilyPad Simple, this board features a JST socket so you can directly connect a Li-Po battery for power and an on-board power switch so you can turn it off when you’re not feeling particularly blinky. These boards were designed to streamline your next sewable project by keeping things simple and giving you more room to work while eliminating the need to sew a power supply. The LiPo battery is even rechargeable through the board, no more special external LiPo chargers required!
LilyPad is a wearable e-textile technology developed by Leah Buechley and cooperatively designed by Leah and SparkFun. Each LilyPad was creatively designed to have large connecting pads to allow them to be sewn into clothing. Various input, output, power, and sensor boards are available. They’re even washable!
Note: A portion of this sale is given back to Dr. Leah Buechley for continued development and education of e-textiles and also to Arduino LLC to help fund continued development of new tools and new IDE features.
Arduino Mega 2560
description: the due is arduino’s first arm-based arduino development board. This board is based on a powerful 32bit cortexm3 arm microcontroller made programmable through the familiar arduino ide. It increases the computing power available to arduino users keeping the language as compatible as possible so that many programs will be migrated in a matter of minutes!
the arduino due has 54 digital input/output pins (of which 12 can be used as pwm outputs), 12 analog inputs, 4 uarts (hardware serial ports), an 84 mhz clock, a usb-otg capable connection, 2 dac (digital to analog), 2 twi, a power jack, an spi header, a jtag header, a reset button and an erase button. There are also some cool features like dacs, audio, dma , an experimental multi tasking library and more.
to compile code for the arm processor, you’ll need the latest version of the arduino ide: v1. 5 (after a period of testing and debugging this will replace the 1. 0. 1 ide altogether)
because of the limitations of system voltage imposed by the atmel sam3x8e, arduino shields that are based on the 5v models won’t work properly. All the shields that fully implement the arduino r3 layout are compatible straight away (like the arduino wifi shield and ethernet shield) but other shields might not be compatible. Be careful when you’re plugging stuff in!
note: unlike other arduino boards, the arduino due board runs at 3. 3v. The maximum voltage that the i/o pins can tolerate is 3. 3v. Providing higher voltages, like 5v to an i/o pin could damage the board.
Arduino Pro Mini Microcontroller Boards 328 – 5V/16MHz
It’s blue! It’s thin! It’s the Arduino Pro Mini! SparkFun’s minimal design approach to Arduino. This is a 5V Arduino running the 16MHz bootloader. Arduino Pro Mini does not come with connectors populated so that you can solder in any connector or wire with any orientation you need. We recommend first time Arduino users start with the Uno R3. It’s a great board that will get you up and running quickly. The Arduino Pro series is meant for users that understand the limitations of system voltage (5V), lack of connectors, and USB off board.
We really wanted to minimize the cost of an Arduino. In order to accomplish this we used all SMD components, made it two layer, etc. This board connects directly to the FTDI Basic Breakout board and supports auto-reset. The Arduino Pro Mini also works with the FTDI cable but the FTDI cable does not bring out the DTR pin so the auto-reset feature will not work. There is a voltage regulator on board so it can accept voltage up to 12VDC. If you’re supplying unregulated power to the board, be sure to connect to the “RAW” pin and not VCC.
The latest and greatest version of this board breaks out the ADC6 and ADC7 pins as well as adds footprints for optional I2C pull-up resistors! We also took the opportunity to slap it with the OSHW logo.
Note: A portion of this sale is given back to Arduino LLC to help fund continued development of new tools and new IDE features.
Arduino Ethernet Shield
Description: The Arduino Ethernet Shield allows an Arduino board to connect to the internet. It is based on the Wiznet W5100 ethernet chip providing a network (IP) stack capable of both TCP and UDP. The Arduino Ethernet Shield supports up to four simultaneous socket connections. Use the Ethernet library to write sketches which connect to the internet via a standard RJ45 Ethernet jack using the shield.
The latest revision of the shield adds a micro-SD card slot, which can be used to store files for serving over the network. It is compatible with the Arduino Uno and Mega (using the Ethernet library). You can access the on-board SD card slot using the SD library which is included in the current Arduino build.
The latest revision of the shield also includes a reset controller, to ensure that the W5100 Ethernet module is properly reset on power-up. Previous revisions of the shield were not compatible with the Mega and need to be manually reset after power-up. The reset button on the shield resets both the W5100 and the Arduino board.
Arduino communicates with both the W5100 and SD card using the SPI bus (through the ICSP header). This is on digital pins 11, 12, and 13 on the Duemilanove and pins 50, 51, and 52 on the Mega. On both boards, pin 10 is used to select the W5100 and pin 4 for the SD card. These pins cannot be used for general i/o. On the Mega, the hardware SS pin, 53, is not used to select either the W5100 or the SD card, but it must be kept as an output or the SPI interface won’t work.
Note that because the W5100 and SD card share the SPI bus, only one can be active at a time. If you are using both peripherals in your program, this should be taken care of by the corresponding libraries. If you’re not using one of the peripherals in your program, however, you’ll need to explicitly deselect it. To do this with the SD card, set pin 4 as an output and write a high to it. For the W5100, set digital pin 10 as a high output.
Note: As of February, 2012, we are shipping the R3 version of this board. The only difference is the appearance of extra pins so that it’s compatible with the Arduino Uno R3 shield design. The functionality is the same and you can still use it with your pre-R3 Arduino but you may want to trim back or de-solder the extra headers.
